When temperatures near or dip below freezing RV Camper Winterizing becomes very important. Just like a bridge may ice over even before freezing temperatures are reached, the same can go for campers. Cold air flows and can build up under the bridge causing it to ice before the actual temperature is below freezing. Likewise cold air flows under RV’s and can cause icing problems.
Why should I winterize my RV trailer?
When water freezes it expands. This causes supply and drain lines and pipes to start leaking or even burst. The cost to repair this damage far exceeds the preventative maintenance of RV winterization.
Also, letting waste water sit in black or gray water tanks for an extended period of time not only increases the risk of water freezing, but it lets potential harmful bacteria grow unimpeded.
When should I winterize my motorcoach or RV Camper?
This varies by your location, but it should definitely be completed before temperatures near freezing. It is important to consider many worse case scenarios.
For instance, in February 2021 the “Great Freeze in Texas” happened. The freeze lasted more than 9 days with the temperature often at or below zero degrees Fahrenheit. The freeze extended as far south as parts of Mexico and many Texans were without power for more than six days. When warmer temperatures rolled around in March and many RV owners prepared their RV’s for spring break trips they found they had leaks and water damage throughout the camper and many of the fixes took time because the service centers were backed up and many had to cancel pre-planned trips to have their RV’s repaired.
Of course RV=911 would be more than happy to come to you with our mobile RV techs and winterize your camper in place without having to move it or take it anywhere.
Remember: most RV insurance policies do not cover damage from frozen water, since it’s avoidable.
Step by step guide: How do I winterize my RV camper?
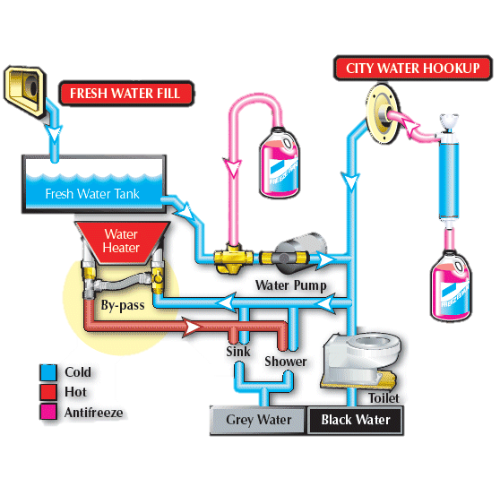
Winterization Objective: replace the water in your lines with antifreeze, which will remain in liquid form even at very low temperatures.
Winterization Project difficulty (with 10 being most difficult): 5
RV Camper Winterizing project requirements:
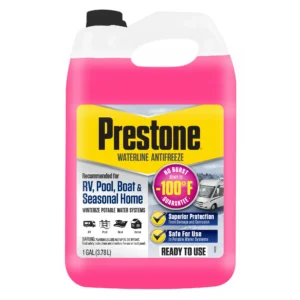
- A few gallons of marine/RV antifreeze—exact amount varies by make and model
- Air compressor.
- A water-heater bypass kit if not already installed
- A cleaning wand (see #2 below)
- Water pump converter kit or tubing to connect to pump inlet valve
- Basic hand tools to remove drain plugs
- A bucket
- Air Compressor (optional)
RV Camper Winterizing Project location:
A flat, level service will make winterization simpler. Also, this project will involve completely emptying all of your tanks. The tanks for black and gray water should only be drained at an approved dumping facility.
Pro-Tip: Before starting go ahead and turn off your water heater so it will be cool when you are ready for that step. The water should not be under pressure and it is good not to get scalded.
Step 1: Remove or Bypass Water Filters
Antifreeze can damage inline water filters. You can find the filter locations in your owner’s manual. They are in different places on different RV models. Sometimes they are under the kitchen sink, in a kitchen cabinet, at a spigot, near the control panel, in the wet bay or potentially almost anywhere.
Pro Tip: This is a great time to examine the filters to see if they need replacement.
Step 2: Drain the RV tanks
Freshwater Holding Tank
This tank is usually centrally located under your RV near an exterior wall. The water in your freshwater tank is potable so it is okay to allow it to drain on the ground or even water your yard (though if in a RV park be considerate of your neighbors). Simply open the valve on this tank.
Black and gray water RV tanks
Find the drain plugs or valves for the black water tank and the gray water tank. These tanks are typically near an exterior wall and usually underneath the bathroom area. Install your drain hose on the black tank first.
Pro Tip: Make sure your drain hose is properly attached at both ends. As simple as it sounds, this is a mistake you will instantly regret and always remember.
Start draining the black tank. If your RV does not have its own tank-flushing system, use a cleansing wand for best results to flush the black water tank. Products like Flush King also help flush the waste out more thoroughly.
Pro Tip: While draining, it is a good idea to lubricate the termination valves with WD-40 for future use.
Next, connect the drain hose to the gray tank and proceed to drain it as well.
Pro Tip: Why the black tank first? If you flush the gray water after the black tank, the gray water will flush your drain hose out keeping it cleaner for storage and future use.
NOTE: ALL TANKS SHOULD BE COMPLETELY EMPTY
Step 3: Drain the water heater and lines
First, turn the water heater off and let it cool. It should not be under pressure when it is drained. Some water heaters have multiple locations to turn off, if so, turn them all off. This includes the one on the water heater itself and if there is one on the outside of the RV or control panel – turn those off too.
Second, shut off the water supply to the RV water heater. The valve is typically within a foot or two of where the hose or pipe enters the water heater. Now that the supply is off, open the pressure relief valve. Before continuing, make sure all water has stopped running from the release valve. Leave the valve open.
Pro Tip: Turn on your faucets hot water spigot so “hot water” flows from it (the water should already be cooled so it isn’t really “hot”. This reduces the pressure on the tank.
Third, we are ready to drain the water heater. This is where a bucket becomes handy. Barely unscrew the drain plug so that only the first few gallons are caught in the bucket and then tighten the drain plug (depending how big your bucket is, consider too that water is heavy). Dump this bucket and continue until the water heater is almost completely empty. Now completely remove the drain plug to capture the last gallon or two of water.
Pro Tip: Check this last gallon for scaling, rust or sediments. These could be signs you need to flush your water heater, replace the anode rod, or possibly that your water heater is going bad and you might need a new one soon.
What is an anode rod? The anode rod is made to corrode before the interior of the water heater does. It is literally considered sacrificial and made to attract corrosion to protect the water heater internally. If the anode rod is heavily corroded it can no longer do its mission and it’s time to replace it before the irreversible process of corrosion of your water heater starts.
Step 4: Draining the RV water lines before completing RV Camper Winterizing
Flush the toilet to remove any water in the toilet tank. Next turn on all faucets. Find the “low point” drain plugs on the water system If you have an outdoor shower, drain it too.
Pro Tip: If using your RV’s 12V water pump to force water out, turn it off as soon as the water is out or the pump will get damaged.
After all the water is drained, recap any plugs and turn off all faucets.
Once the water is drained, recap all drains and close all faucets.
If you have a washing machine or dishwasher, you also need to drain and winterize these.
Pro Tip: For best results, it is highly recommended an air compressor could be used to “blow out the lines” and remove any remaining water completely. In some environments, this may be required.
Step 5: Water Heater ByPass
Before adding antifreeze into the system, consider bypassing the water heater. Why? Because, depending on the size of your water heater, you could easily be wasting 6-10 gallons or more of antifreeze. Also when it is time to DEwinterize, it adds a step to the process and makes it more difficult.
If your RV does not have a hot water heater bypass installed, it is recommended to have your RV mobile service tech install one.
Step 6: Add antifreeze
RV Camper Winterizing – now you are ready to introduce antifreeze into your plumbing system. There are two varying methods of doing this.
One method is to install a water pump conversion kit (or have a tech install one for you). Another method is to use the inlet side of the RV water pump.
If you have a water pump conversion kit, it will come with instructions you should follow for this step. If you are using the inlet side of your RV water pump, disconnect the line coming from the freshwater tank and attach tubing to the inlet. Place the other end of the tubing into your container of antifreeze.
Your freshwater tank could be used to distribute antifreeze, however it is not recommended as it will increase the amount of antifreeze needed.
Pro Tip: Use a non-toxic marine / RV antifreeze. There are several food grade RV antifreezes you can choose from. Remember you will later have fresh water that you will drink and cook with in these same lines and you do not want any toxic residues.
Now turn on the pump which will pressurize your camper plumbing system. Beginning with the faucet closest to the pump, slowly turn on the hot, then cold faucets until antifreeze comes out. Turn off the faucet. Do this to all faucets in the RV trailer moving farther and farther from the pump (including any outdoor showers or hoses). Keep an eye on your container of antifreeze.
Pro Tip: If you have small bottles of antifreeze you can dump them into the larger bucket you used to drain the hot water heater.
If you have a dishwasher or clothes washer, you need to also introduce antifreeze into these systems once they are drained.
Flush the toilet until antifreeze appears in the bowl. To introduce antifreeze into the holding tank by pouring a cup into the drains and bowl. Flush the toilet again.
Turn off the water pump and open a faucet to release pressure on the plumbing system. Go to your city (or provider) water inlet valve. Remove the screen if there and depress the valve with a screwdriver and hold until antifreeze comes out. Replace the screen and close the inlet.
NOTE: Double check that all faucets are off and the water heater’s heating element is off.
Step 7: Battery Maintenance
Your batteries should be disconnected, removed and stored in a cool, dry place.It is important to periodically charge your batteries to prolong their life and prevent damage. Removing your batteries and storing them indoors will extend the life and help them keep their charge. You may consider keeping your batteries connected to a trickle charger or battery conditioner.
Pro Tip: Store the batteries with something underneath them (like cardboard) in case the batteries leak.
Step 8: Exterior protection and winterization
Tire Care – your tires should be stored at a specific pressure during winterization. The pressure should be provided by your tire manufacturer. You could also consider tire covers that protect against UV rays as well as using recommended chocks.
Pro Tip: If possible, occasionally move the RV to prevent flat spots in the tires.
RV exterior – you can make sure you have any cracks or gaps sealed and even add protective wax coatings – or, an easier solution is to get a quality RV cover or skirt. This can help protect your RV from harsh winter conditions and any water penetration that could occur.

Of course RV=911 would be more than happy to come to you with our mobile RV techs for RV Camper winterizing in place without having to move it or take it anywhere.